This is the extension for physical computing, using sensors, motors, etc in NetLogo. It interfaces with GoGo boards running Human Interface Driver (HID) firmware, and it replaces the old GoGo Extension, which used USB-serial communications. (The USB-serial GoGo extension is still available for NetLogo 5.3.1 and earlier here.)
This extension comes bundled with NetLogo 5.2 and later. The source code is hosted online at https://github.com/NetLogo/GoGo-HID-Extension.
NetLogoLab is the technological infrastructure that connects NetLogo and the physical world. It can be used for robotics, interactive art, scientific investigations, and model validation. This infrastructure was created at the CCL by Paulo Blikstein and Uri Wilensky in 2005 as part of the Bifocal Modeling project. For more information, please check the new and old websites, where you will find academic papers, models, and demos.
NetLogoLab is comprised of the following software and hardware components:
NetLogo’s robotics/data-logging board of choice is the GoGo Board, an open-source, easy-to-build, low-cost interface designed by Arnan Sipitakiat and Paulo Blikstein, first at the MIT Media Lab, then at Northwestern’s CCL, and is in continuous refinement. Other robotics hardware can be used with NetLogo, including those that are commercially available, such as Arduino boards, Vernier and Pasco sensors and actuators, Phidgets, and VEX kits, but specific extensions have not yet been developed for each of those platforms. So far, only the GoGo Board extension is available with NetLogo’s standard distribution.
The GoGo Extension for NetLogo provides primitives to communicate with a GoGo Board. This enables the user to connect NetLogo with the physical world using sensors, motors, light bulbs, LEDs, relays and other devices.
A GoGo Board is a low cost, general purpose serial interface board especially designed to be used in school and for educational projects. It was created by Arnan Sipitakiat and Paulo Blikstein at the MIT Media Lab in 2001, and has been actively developed since then. It is currently used in over 10 countries, such as the United States, China, Thailand, South Korea, Brazil, Portugal, Mexico, Malaysia, and Egypt. For more information see the the gogo board about page.
Up to 8 sensors (i.e., temperature, light, pressure) and 4 output devices (i.e., motors, light bulbs, LEDs, relays) can be connected to the board simultaneously. The board also has a connector for add-on devices (such as displays, Bluetooth or ZigBee wireless modules, voice recorders, real-time clock, and GPS).
NetLogo models can interact with the physical world in two ways. First, they can gather data from the environment. This information can be used by the model to change or calibrate its behavior. This data is gathered using electronic sensors, which can measure a wide range of phenomena: temperature, light, touch (see pictures below), pH, chemical concentration, pressure, etc. See the Gogo docs here for info on the the sensors that are included with a GoGo board kit.
The second mode of interaction between NetLogo and the physical world is the control of output devices, or “actuators” - motors, light bulbs (see pictures below), LEDs, and more complex devices that include these outputs such as toys, remote controlled cars, electrical appliances, and automated laboratory equipment. See the Using Output Ports section of the GoGo docs for more info.
The GoGo board also comes with Terminal Connectors to wire in additional sensor that don’t come included. Additional sensors and actuators can be found through online retailers such as Digikey, Mouser, Phidgets, Spark Fun, and Solarbotics.
To make use of the GoGo Board extension and the NetLogoLab framework, users need to create NetLogo models using the special primitives made available by the extension. Later in this document, we will provide examples of models that do this.
Gogo Boards can be purchased from the SEED Foundation.
The GoGo Board connects with the computer via the USB port. Turn the GoGo Board on using the switch behind the power connector: the board will beep twice and the red light will turn on.
Plug in your GoGo board and go to https://code.gogoboard.org/. The website should prompt you to download the gogo plugin for Windows. You can now try using the NetLogo GoGo extension. If you don’t have Java installed, you will be prompted to locate your java executable. You will need to install Java to get the extension to work. We recommend using the Java 17 which is the version used by NetLogo as of NetLogo 6.3.0, installer here: https://www.oracle.com/java/technologies/downloads/#java17. You can check which Java version your system is using by running java -version in the command line.
The GoGo extension requires no special installation on Mac OS X. If you don’t have Java installed, you will need to install Java 17 which is the version used by NetLogo as of NetLogo 6.3.0, installer here: https://www.oracle.com/java/technologies/downloads/#java17. You can check which Java version your system is using by running java -version in the command line.
Many versions of Linux require no special installation.
The GoGo Extension comes preinstalled when you download and install NetLogo. To use the extension in your model, add this line to the top of your Code tab:
extensions [ gogo ]
If your model already uses other extensions, then it already has an extensions line in it, so just add gogo to the list.
After loading the extension, you can see if the gogo board is connected by seeing if it will beep when you type into the command center:
gogo:beep
Or, you can see whether one or more HID-based gogos are on and attached to the computer by typing the following into the command center:
gogo:howmany-gogos
For examples that use the GoGo extension see GoGoMonitor and GoGoMonitorSimple models in the Models Library and the example projects at the bottom of this page.
Compared to previous versions of the GoGo extension, this version offers:
gogo:talk-to-output-ports
gogo:set-output-port-power
gogo:output-port-on
gogo:output-port-off
gogo:output-port-clockwise
gogo:output-port-counterclockwise
gogo:set-servo
Reports the number of USB HID devices visible to the computer and having the correct vendor and product ID to be a GoGo board. A board will only be detected if it is both connected and powered on. Using this primitive is one way to determine quickly whether a GoGo board has the HID firmware loaded. (A USB-Serial version of the board will not be detected.).
Establishes a list of output ports that will be controlled with subsequent output-port commands. See below…
power-level is a number between 0 and 100, reflecting the percentage of maximum power.
Sets the amount of power that will be fed to the output ports indicated in talk-to-output-ports.
This will not affect the on-off state of the output ports.
So, for example, if a motor is already connected to an output port and running, changing its power will change its speed.
If the motor is not running, changing the power level will not turn it on; instead, it will affect the speed at which the motor starts when it is turned on with output-port-on.
Turns on the output ports which have been indicated with talk-to-output-ports. If none have been set with talk-to-output-ports, no ports will be turned on.
Turns off the output ports which have been indicated with talk-to-output-ports. If none have been set with talk-to-output-ports, no ports will be turned off.
Sets the polarity of the output port(s) that have been specified with talk-to-output-ports, so that a motor attached to one of these ports would turn clockwise.
Sets the polarity of the output port(s) that have been specified with talk-to-output-ports, so that a motor attached to one of these ports would turn counterclockwise.
Sets the Pulse-Width Modulation (PWM) proportion of the output port(s) that have been specified with talk-to-output-ports. Note that the servo connectors are the male pins next to the standard motor connectors. Different servos respond to different PWM ranges, but all servos read PWM proportions and set the position of their main gear accordingly.
Turns the user-LED on or off, depending on the argument. gogo:led 1 turns the LED on; gogo:led 0 turns it off.
Reports a list containing the current readings of all eight sensors ports of the GoGo.
Reports the value of sensor number which-sensor, where which-sensor is a number between 0-7.
Reports all data available from the board, in a raw-list form useful for debugging.
Sends a list of bytes to the GoGo board. Useful for debugging or for testing any new or future functionality that is added to the GoGo board with new firmware updates.
The first step when creating a NetLogoLab model is to add the extensions keyword to NetLogo’s Code tab. Just go to the Code tab and add this line:
extensions [gogo]
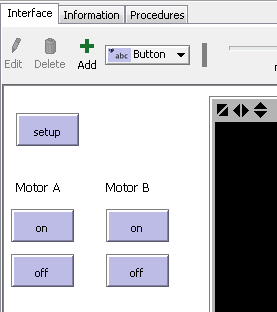
Now let’s start the model. Imagine that we want to control a car with four wheels and two motors attached to the back wheels. We will assume that you have built such as car and connected the motors to the output ports “a” and “b” on the GoGo board. One very simple approach could be to create two buttons for each motor, “on” and “off”:
The code associated with these buttons is very simple: for the “on” button, we could simply have
gogo:talk-to-output-ports ["a"]
gogo:output-port-on

For the off button, it would be very similar:

gogo:talk-to-output-ports ["a"]
gogo:output-port-off
The other set of “on” and “off” buttons, used to control the second motor, would have very similar code, except that we would use the second output port (“b”), so:
gogo:talk-to-output-ports ["b"]
We could make our model more interesting by adding a “toggle direction” button, adding a button with the following code, which would reverse the direction of motors “a” and “b”:
gogo:talk-to-output-ports ["a" "b"]
gogo:output-port-reverse
To create a simple sensing project, we will assume that you have added the GoGo extension to your model and successfully opened a connection to the GoGo board, i.e., adding the “extensions” command to the Code Tab. For this sensing project we do not need motors, but we will need another device: a temperature sensor. A standard GoGo board comes with a temperature sensor. It is labeled (TEMP Sensor). More info on the sensors that come standard with a gogo board can be found in the GoGo Docs. The simplest use of a temperature sensor, obviously, is to display the temperature. We could achieve this by plugging the sensor in to input 1 and adding a monitor to the NetLogo interface with this code:
gogo:read-sensor 1
The GoGo docs say, “Note that the readout is not in Celsius or Fahrenheit. The value is reflects the resistance of the sensor. Mappings between the resistance and the standard units must be done manually.” So, to figure out how these values map to a real temperature, you will need to use a thermometer and see how the reading on the temperature sensor corresponds to the temperature in degrees. If you found out that the conversion is to divide by 30, the monitor on the NetLogo interface could be changed to:
gogo:read-sensor 1 / 30
The sensor value could also be used to control on-screen objects, such as turtles. For example, let us create two buttons: a “create one turtle” button, which will clear the world and create a turtle, and a “move with heat” button, that will cause the turtle to move forwards depending on the temperature reading from the sensor. The code would look like this:
to create-one-turtle
  clear-all
  create-turtle
end

to move-with-heat
  if gogo:read-sensor 1 > 500
    [ forward 1 ]
end
If the “move with heat” forever button is activated and the user heats up the sensor (by rubbing it, or slowly bringing a flame near it), the heat threshold will be achieved (> 500) and the turtle will move.
A more elaborate use of this sensor apparatus would be to control output devices, such as motors. The user could, for example, turn a motor on when the value from the temperature sensor reaches 500, using the following code:
to turn-motor-on-with-heat
  if gogo:read-sensor 1 > 500
  [
    gogo:talk-to-output-ports ["a"]
    gogo:output-port-on
  ]
end
Another possible use of the sensing primitives is to plot and log data. Logging could be useful for more elaborate data analysis and comparison, and can be achieved with NetLogo’s list commands. For example, if the user wants to log sensor values from sensor 1 every 0.5 seconds, the code could look like this:
to log-data-from-sensor
  set data-vector lput (gogo:read-sensor 1) data-vector
  wait 0.5
end
Finally, plotting data is straightforward. The following code, for example, would create a graph for the value of sensor 1:
plot (gogo:read-sensor 1)